Mais uma idéia do blog Betz White, com o PAP AQUI.

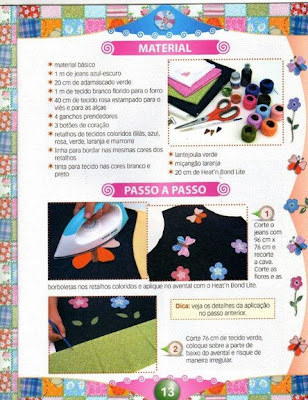
 MATERIAIS NECESSÁRIOS:
Dicas de montagem:
CONSELHOS PARA CONFECCIONAR LINDAS BONEQUINHAS DE PANO:
Trabalhe sempre com o tecido depois de lavado em sabão neutro. Deixe-o de molho até que saia toda a goma e lave.
*Nunca deixe de molho tecidos de cores claras e escuras no mesmo recipiente. Geralmente eles desbotam e podem manchar uns aos outros.
*Para quem não tem muita prática na confecção de bonequinhas e bichinhos de pano, uma dica é trabalhar com o tamanho natural das peças.
*Geralmente a ordem é: riscar o molde no tecido, costurar à máquina e somente depois cortar (deixando 0,5cm de margem).
*Onde há curvas dê um pique com a tesoura, ainda no avesso.
*Você não deve fazer o enchimento com "tufinhos" de fibra. Isto deixa a peça empelotada.
*Para fechar as aberturas do corpinho das bonecas e pregar cada parte no seu respectivo lugar use linha de pipa... é mais resistente!
*Combine os tecidos antes de cortá-los. Nunca utilize só xadrez, ou só estampa floral, ou só tecido liso. Faça uma bela combinação entre eles!
*Experimente tingir os tecidos no chá preto, chá verde, café, água de pinhão, água de beterraba, etc. Para conhecer as técnicas de Tingimento Natural e Pano Assado na Confecção de Bonecas adquira nossa apostila.
*Antes de utilizar uma caneta permanente para pintar o rostinho teste-a num outro tecido qualquer. E prefira sempre as mais fininhas (0,05 ou 0,1). Existem muitas marcas que mancham o tecido e acabam estragando a peça. Dê preferência para as importadas.
*Se você já tem prática, use tinta PVA látex ao invés da caneta permanente. O trabalho fica muito mais bonito!
*Pinte as bochechas com blush e um pincel de cerdas duras. Para isso faça movimentos em cruz nos cantos do rostinho... nunca em círculo.
*Para finalizar... o acabamento é o conjunto de detalhes bem feitos. Portanto, cada pedacinho deve ser produzido com muito carinho.*
www.ideiaseretalhos.com.br

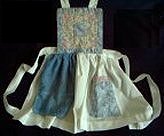
 4) Baste raw edges of neck strap to top of apron front, matching raw edges and spacing strap 5/8" from each angled side edge. See Fig. 3. Baste tie ends to either side of apron front, matching raw edges and spacing ties 5/8" down from bottom of angled side edge. See Fig. 3. Baste pocket right side up along bottom edge of apron front, matching raw edges and centering pocket along bottom edge of apron. See Fig. 3. Pin pocket in place on front of apron.

 While all possible care has been taken to ensure the accuracy of this pattern, we are not

 Clique para obter o