Lindinho, né?
Mostrando postagens com marcador avental. Mostrar todas as postagens
quarta-feira, 2 de junho de 2010
domingo, 10 de janeiro de 2010
quarta-feira, 22 de julho de 2009
terça-feira, 7 de julho de 2009
quinta-feira, 25 de junho de 2009
quarta-feira, 13 de maio de 2009
domingo, 3 de maio de 2009
Avental para churrasco (BBQ)
Para obter o tutorial, clique aqui.
Marcadores:
appliqué,
apron,
avental,
molde,
pap,
passo a passo,
patchcolagem,
tutorial
domingo, 19 de abril de 2009
Molde de avental com appliqué (patchcolagem)


Marcadores:
appliqué,
apron,
avental,
borboleta,
flor,
flower,
flower tutorial,
molde,
pap,
passo a passo,
patchcolagem,
risco
domingo, 5 de abril de 2009
Avental com aplicação by Jo-Ann
Para obter o projeto, clique AQUI.

Marcadores:
appliqué,
apron,
avental,
pap,
passo a passo
terça-feira, 31 de março de 2009
terça-feira, 10 de março de 2009
Avental para Churrasco
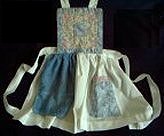
Summer Fun BBQ Apron by Adrienne Franklin
A festive addition to the barbecue season!
Pattern Level: Easy - Some sewing experience helpful 1/2" seam allowance used throughout and has been added unless otherwise noted.
Finished Size: one size fits most.
100 % cotton- 44/45" wide
Materials Needed:
2-yards Chambray blue solid
1/8-yard of each of the following solids: red, gold, light green, ivory, rust and brown
1 1/2 -yards lightweight fusible interfacing
paper backed fusible web (heatn’bond lite or wonder under)
Matching threads, clear monofilament thread
Cutting and Assembly:
1) Cut 2 pieces 30"x31" of chambray solid.
Fold each piece in half lengthwise.
Referring to Figure 1 for each apron piece, measure over from the fold on the top edge 5" and mark. Measure 11 1/2" down from top cut edge and mark. Place a ruler on the angle between the 2 markings, mark and trim off corner. One of these pieces will be the apron front and one will be the apron lining.
3) For neck straps and tie ends, cut 3 strips of chambray solid 3"x25". Also cut 3 interfacing strips 3"x25".
Following manufacturer’s instructions fuse interfacing strips to the wrong side of neck strap and tie ends.
Press 1/2" to inside along each long edge of neck strap.
Press strap in half lengthwise with folded edges together. Stitch together close to folded edges. Stitch close to remaining long edge. See Fig 2a. Repeat for 2 remaining tie ends. Narrow hem 1 short end of each tie end by turning in 1/4" to inside, then folding in another
1/4" and stitching. See Fig 2b.
4) Baste raw edges of neck strap to top of apron front, matching raw edges and spacing strap 5/8" from each angled side edge. See Fig. 3. Baste tie ends to either side of apron front, matching raw edges and spacing ties 5/8" down from bottom of angled side edge. See Fig. 3. Baste pocket right side up along bottom edge of apron front, matching raw edges and centering pocket along bottom edge of apron. See Fig. 3. Pin pocket in place on front of apron. 

While all possible care has been taken to ensure the accuracy of this pattern, we are not
responsible for printing errors or the way in which individual work varies.
©Cranston, a Division of ©Cranston Print Works Company
www.CranstonVillage.com
A festive addition to the barbecue season!
Pattern Level: Easy - Some sewing experience helpful 1/2" seam allowance used throughout and has been added unless otherwise noted.
Finished Size: one size fits most.
100 % cotton- 44/45" wide
Materials Needed:
2-yards Chambray blue solid
1/8-yard of each of the following solids: red, gold, light green, ivory, rust and brown
1 1/2 -yards lightweight fusible interfacing
paper backed fusible web (heatn’bond lite or wonder under)
Matching threads, clear monofilament thread
Cutting and Assembly:
1) Cut 2 pieces 30"x31" of chambray solid.
Fold each piece in half lengthwise.
Referring to Figure 1 for each apron piece, measure over from the fold on the top edge 5" and mark. Measure 11 1/2" down from top cut edge and mark. Place a ruler on the angle between the 2 markings, mark and trim off corner. One of these pieces will be the apron front and one will be the apron lining.
2) Cut 2 pocket pieces 10"x17" from chambray solid. Cut 1 piece of interfacing 10"x17". Following manufacturer’s instructions fuse interfacing to the back of 1 pocket piece.
This will be the pocket front. Trace appliqué motifs onto the paper side of the fusible web allowing 1/4" around each motif. Dotted lines shown where one motif under laps another. Cut out each motif roughly around edges. Following manufacturer’s instructions fuse motifs to specified fabrics.
Cut out motifs along drawn lines, peel paper and fuse to front of pocket referring to photo and placement diagrams. Stitch around edges of each motif with a satin stitch and matching thread. Stitch lines on the top of mustard and ketchup bottles if desired. Pin 2 pocket pieces with right sides facing and stitch around 2 side edges and top edge leaving the bottom edge open for turning. Clip corners; turn right side out and press.
3) For neck straps and tie ends, cut 3 strips of chambray solid 3"x25". Also cut 3 interfacing strips 3"x25".
Following manufacturer’s instructions fuse interfacing strips to the wrong side of neck strap and tie ends.
Press 1/2" to inside along each long edge of neck strap.
Press strap in half lengthwise with folded edges together. Stitch together close to folded edges. Stitch close to remaining long edge. See Fig 2a. Repeat for 2 remaining tie ends. Narrow hem 1 short end of each tie end by turning in 1/4" to inside, then folding in another
1/4" and stitching. See Fig 2b.
5) Pin apron front to lining right sides facing and stitch around all edges leaving an opening on one side for turning. Clip corners; turn right side out and press. Edge stitch close to all apron edges, stitching opening closed.
Topstitch 1/4" away from edge stitching all around.
Stitch pocket to apron close to pocket sides. See Fig.4 Mark and stitch 3 lengthwise divisions each 4" apart in pocket to hold utensils. Use invisible thread for stitching incase you have to stitch through appliqué motifs.
Topstitch 1/4" away from edge stitching all around.
Stitch pocket to apron close to pocket sides. See Fig.4 Mark and stitch 3 lengthwise divisions each 4" apart in pocket to hold utensils. Use invisible thread for stitching incase you have to stitch through appliqué motifs.
responsible for printing errors or the way in which individual work varies.
©Cranston, a Division of ©Cranston Print Works Company
www.CranstonVillage.com
Enviado pela Pathy da Comunidade "Patchcolagem - Appliqué"
Marcadores:
appliqué,
apron,
avental,
molde,
passo a passo,
patchcolagem,
patchwork
Avental para costura (Patchcolagem)
Marcadores:
appliqué,
apron,
avental,
molde,
passo a passo,
patchcolagem,
patchwork
sábado, 6 de dezembro de 2008
Avental

Bem fofo!
Para ver o passo-a-passo, clique aqui: http://projectsforyournest.blogspot.com/2008/01/apron-tutorial.html
Avental mimosíssimo!

Esse tá demais!
Não sei que tipo de aplicação é esta, mas dá pra fazer com técnica de patchcolagem.
Espero que gostem!
Para ver o passo-a-passo, clique aqui:
Assinar:
Postagens (Atom)